Atomic Force Microscope AFM5500MⅡ

The AFM5500MⅡ is an AFM platform equipped with a fully addressable 4-inch stage, optimized for medium-sized samples. It affords exceptional levels of ease of use, automation, and accuracy, as well as correlation for AFM/SEM investigations.
Features
Ease of Use
Significantly simplifying the AFM operation
- Wide-open tip and sample access
- Fully addressable 4-inch stage eliminating the need for sample remount/rotation
- Point-and-click function enabling easy and quick camera-based sample navigation
- All built-in accessories allowing seamless and software-controlled mode switching

Easy and quick positioning
Multipoint measurement
Automation
Easier, faster, and more precise AFM imaging
- Automated cantilever exchange
- Automated laser alignment
- Automated image optimization (RealTune® II)
- Automated AFM measurements following a recipe

Easy to remove/attach
Accuracy
Enhanced accuracy of AFM measurements
- Flexure-based design providing superior flat and orthogonal scan
- Closed-loop scanner allowing highly linear and accurate imaging
- Low sensor noise yielding high-resolution and high-quality results
- Tip evaluation capability ensuring probe quality and artifact-free images
Flat Scan
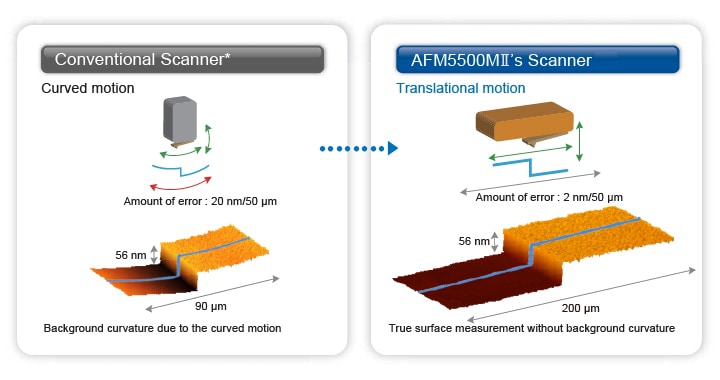
Conventional AFM with a piezoelectric tube scanner requires data flattening or leveling because of its intrinsic curved motion. However, this flattening may distort a sample' s micro-surface structure, including its Z value. The newly developed AFM5500MⅡ is equipped with a flexure-based scanner that enables well-controlled raster scans along X and Y directions only. As a result, this advanced scanner design can effectively eliminate background curvatures in a wide scan area and improve the accuracy of AFM measurements.

High Orthogonality
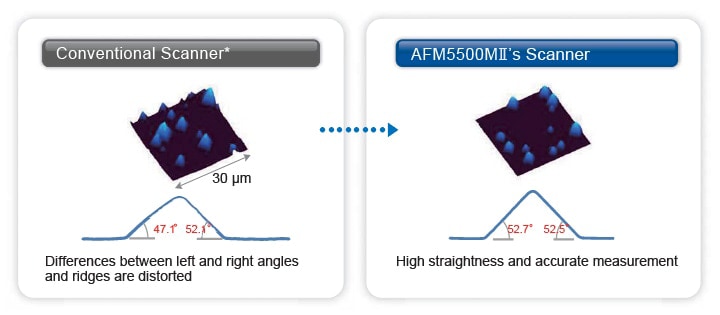
Using a conventional piezoelectric tube scanner can cause cross-talk when bending the tube scanner.
This cross-talk leads to distortions and asymmetrization. The improved AFM5500MⅡ’s scanner reduces cross-talk making both accurate and symmetric measurements possible.

* When using our company small unit (with an open loop control)
Correlation
Correlative AFM and SEM Imaging
The Hitachi-proprietary SEM/AFM shared alignment holder provides quick and easy measurements and analysis of topography, structures, composition, and surface property.


AFM and SEM Measurements of the Same Area (Sample:Graphene/SiO2)
Overlay images of SEM, AFM (topography), and KFM (surface potential)
- It can be concluded from AFM cross-session height measurements that those contrast differences in the SEM image are corresponding to the variation of graphene layers in the AFM image.
- It indicates that surface potential (work function) of graphene sheets is highly dependent on the sample thickness, i.e., the number of graphene layers.
- High-precision 3D topographic data in conjunction with the electrical property examination provide strong evidence for identifying the root cause of captured variations in SEM contrasts.
Hitachi High-Tech Science will continue to develop AFM-correlated systems with other types of microscopes and inspection equipment.
Specifications
| Stage | Automated, fully addressable 100 mm (4 inch) stage Travel range: XY ±50 mm (2 inch), Z ≥21 mm Minimum step size: XY 2 µm, Z 0.04 µm |
|---|---|
| Sample Size | Diameter: 100 mm (4 inch) Thickness: 20 mm Weight: 2 kg |
| Scan Range | 200 µm x 200 µm x 15 µm (XY: Closed loop control, Z: Displacement sensor) |
| RMS Noise Level* | ≤0.04 nm (High-resolution mode) |
| Repeatability* | XY: ≤15 nm(3σ, measuring 10 µm pitch)/Z: ≤1 nm (3σ, measuring 100 nm depth) |
| XY Orthogonality | ±0.5° |
| Bow* | ≤2 nm/50 µm |
| Detection | Optical lever (Low-coherence light) |
| Top-viewOptical Microscope | Zoom magnification: x1 to x7 Field of vision: 910 µm x 650 µm to 130 µm x 90 µm Monitor magnification: x465 to x3255 (27 inch monitor) |
| Anti-vibration | Desktop active anti-vibration 500 mm(W) x 600 mm (D) x 84 mm (H), approximately 28kg |
| Soundproof Cover | 750 mm(W) x 877 mm (D) x 1400 mm(H), approximately 237 kg |
| Size | 400 mm(W) x 526 mm(D) x 550 mm(H), approximately 90 kg |
* System performance depends on installation environment and its configuration.
| RealTune® II | Automatic tuning of cantilever amplitude (DFM), contact force, scan speed, and feedback gains (Various tuning modes including Auto, Fast, Soft, Rough, and Point) |
|---|---|
| Various Functions | Operating instructions; Tab structure (Measurement/ Analysis); Measurement area indicator/ Measurement area tracking window; Batch processing; and Tip calibration |
| Operating Voltage | 0 to 150 V |
| Multi Channel (Data Points) |
4 channels (max. 2048 x 2048) 2 channels (max. 4096 x 4096) |
| Rectangular Scan | 2:1, 4:1, 8:1, 16:1, 32:1, 64:1, 128:1, 256:1, 512:1, 1,024:1 |
| Analysis Software | 3D display and overlay, Roughness, Cross-section, Average cross-section |
| Automated Functions | Automated cantilever exchange and laser alignment |
| Size | 340 mm(W) x 503 mm(D) x 550 mm(H), approximately 34 kg |
| Power Supply | AC 100 to 240 V ±10 % |
| Measurement Modes | AFM(contact mode), DFM (tapping mode), PM, FFM, LM-FFM, VE-AFM, Adhesion, Current, Pico-Current, SSRM, PRM, KFM, EFM(AC), EFM(DC), MFM, SIS-Topography, SIS-Property |
* “RealTune“ is a registered trademark of Hitachi High-tech Science Corporation in China and Japan.
| Compatible Hitachi SEM | SU8240, SU8230 (H36 mm), SU8220 (H29 mm) |
|---|---|
| Sample Holder Size | 41 mm(W) x 28 mm(D) x 16 mm(H) |
| Sample Size | Φ20 mm x 7 mm |
| Alignment Accuracy | ±10 µm (AFM alignment accuracy) |
